.png)

Under Construction
Brillo Eterno
Project Brief
Consider a space for a candle and the purpose it will serve, then design a candle holder that would fit in that space.
Course: DES 326 Objects and Spaces
Professor: Kate Caterall
Time Frame: 4 weeks
Tools: Procreate, Adobe Illustrator, foam, wood, bandsaw, sand belt, hand sander, paint
Design Problem
How can I design a candleholder that for the Day of the Dead that can be used in an ofrenda but also represent the meaning of the holiday?
Research
I focused part of my research on the meaning of candles in Mexican culture as well as the traditional process of making candles and candleholders. Additionally, I researched the customs of the holiday, its origin, as well as the role of candles in the holiday.
In order to design a candleholder with cultural significance, I focused part of my research on the meaning of candles in Mexican culture as well as the traditional process of making candles and candleholders. Main points of significance include:
-
Aztecs used candles to mark important events such as births, deaths, and marriages
-
Candle holders are commonly seen as veladoras (votive candles)
-
Intricate candle holders tend to resemble candelabras, are made of clay, and are very colorful
To represent the meaning of the Day of the Dead, I researched the customs of the holiday, its origin, as well as the role of candles in the holiday.
-
Day of the Dead originated from the Aztecs
-
Candles are used to guide spirits back
-
A candle is lit for every person deceased and placed in offering
-
Common symbols include: skulls, vibrant colors, a lot of patterns, alebrijes (spirit guides), and marigolds.

Sketching
I wanted my candleholder to represent the meaning of the Day of the Dead, as if telling the story of a spirit’s journey during the holiday and fit the aesthetic of the holiday in order to be used in an offering. So my first idea looked like this. However, this idea posed several problems as it had too many individual elements.
I continued to create more sketches of variations of my first idea, but none of them satisfied me. Many of them resembled a chess piece or an hourglass, which I wanted to avoid. After a check-in with my professor, she proposed a different shape in order to avoid those resemblances since they didn’t fit my objectives. I decided to develop this sketch further.


I developed the idea further by creating orthographic drawings starting from the front view in order to finalize the starting shape and continued with the side view to settle the thickness of the structure. The top and perspective views followed. With this new shape, my objective of representing the meaning of the Day of the Dead could be represented in different ways and was 1 complete, flowing structure rather different pieces making a whole.
Construction
When I brought in my plans, the woodshop tech proposed that instead of cutting from a really thick block of wood, I laser cut the inside shape out, therefore it will be crisp and secure. Doing it in the woodshop, we would run the risk of having the saw going diagonally and create a crooked and uneven shape on the inside.
Therefore, I created the inside shape on Illustrator and duplicated it 8 times as the wood I would be using would be quarter-inch, thus, I would need 8 to create 2 inch thickness. 6 of those rectangles had a rectangle hole at the top to create the hole at the top of the structure where the candle would be placed.

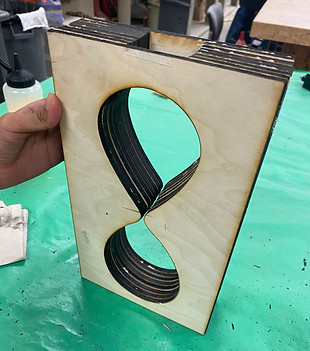
Once glued, I traced over the etched outline on the front of the block in order to have a clearer outline when cutting the outside shape on the bandsaw.
Then, I created the side outline to cut out the varying thickness in my structure. However, when I showed it to the woodshop tech, he let me know that the top of my structure could not be curved if I wanted to keep the hole at the top, so we left it out when cutting.
After creating the outlines, I headed to the bandsaw and began by cutting out the side to create the varying thickness of my structure.
After that, I saved the cut out pieces and taped them back to keep the front outline and cut it out smoothly.
Once I cut everything out, all that was left was sanding.
I started by using the belt sanders to sand the sides. Once I was satisfied, I used a handheld sander to sand the front and back as well create the round curves on my structure. Lastly, I manually sanded the inside shape in order to smooth it out and get rid of the burn marks.

Graphics

After finishing the structure, I headed to procreate to create my illustrative poster. I created the perspective of the image by taking a picture of my structure at an angle and then traced over it. Then I added the skull and the marigolds, which are also important symbols of Day of the Dead.
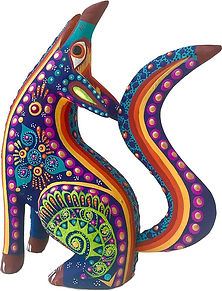
My initial idea had an actual alebrije figure on the structure, but I decided to change that idea and instead make the structure an alebrije, thus, the candle holder itself is what guides a spirit to and from the real world and the spirit world. Therefore, I gathered some references for alebrije patterns.
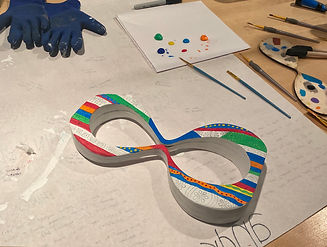
I primed my structure and once dry, I sketched the patterns with a pencil and chose what colors to use. I chose to use blue, red, orange, purple, green, and yellow. I didn’t plan out where the colors or the patterns would be placed. Everything was randomized as alebrijes are very colorful and erratic. I wanted my candleholder to be the same.

